Are your garden tools scattered all over the place, making every gardening session a frustrating hunt? You’re not alone.
When your tools are disorganized, you waste time and energy that could be spent enjoying your garden. But imagine reaching for exactly what you need, right when you need it—no digging, no mess. With smart garden tool organization, you can transform your gardening routine into a smooth, stress-free experience.
Ready to discover simple tips and clever solutions that will keep your tools tidy, accessible, and ready for action? Keep reading, and let’s make your garden space work for you.
Sort Tools By Type
Sorting garden tools by type helps keep your workspace clean and efficient. It saves time searching for the right tool. Grouping tools in categories makes them easy to find and store.
Organizing tools by type also protects them from damage. Proper storage extends their lifespan and keeps them ready for use. Clear separation avoids clutter and confusion.
Separate Long-handled Tools
Keep rakes, shovels, and hoes upright in a corner or rack. Use wall hooks or a sturdy stand to hold them securely. This prevents handles from tangling and keeps the floor clear.
Group Hand Tools Together
Collect small tools like pruners, trowels, and weeders in a box or drawer. Use containers or trays to avoid mixing different types. It helps maintain order and quick access.
Store Power Tools Safely
Keep electric trimmers, blowers, and drills in a separate area. Use shelves or cabinets to protect them from dust and moisture. Charging stations nearby can keep batteries ready.
Arrange Garden Accessories
Group gloves, seed packets, and watering cans in one spot. Use bins or baskets to hold these smaller items. This keeps essential accessories handy and organized.
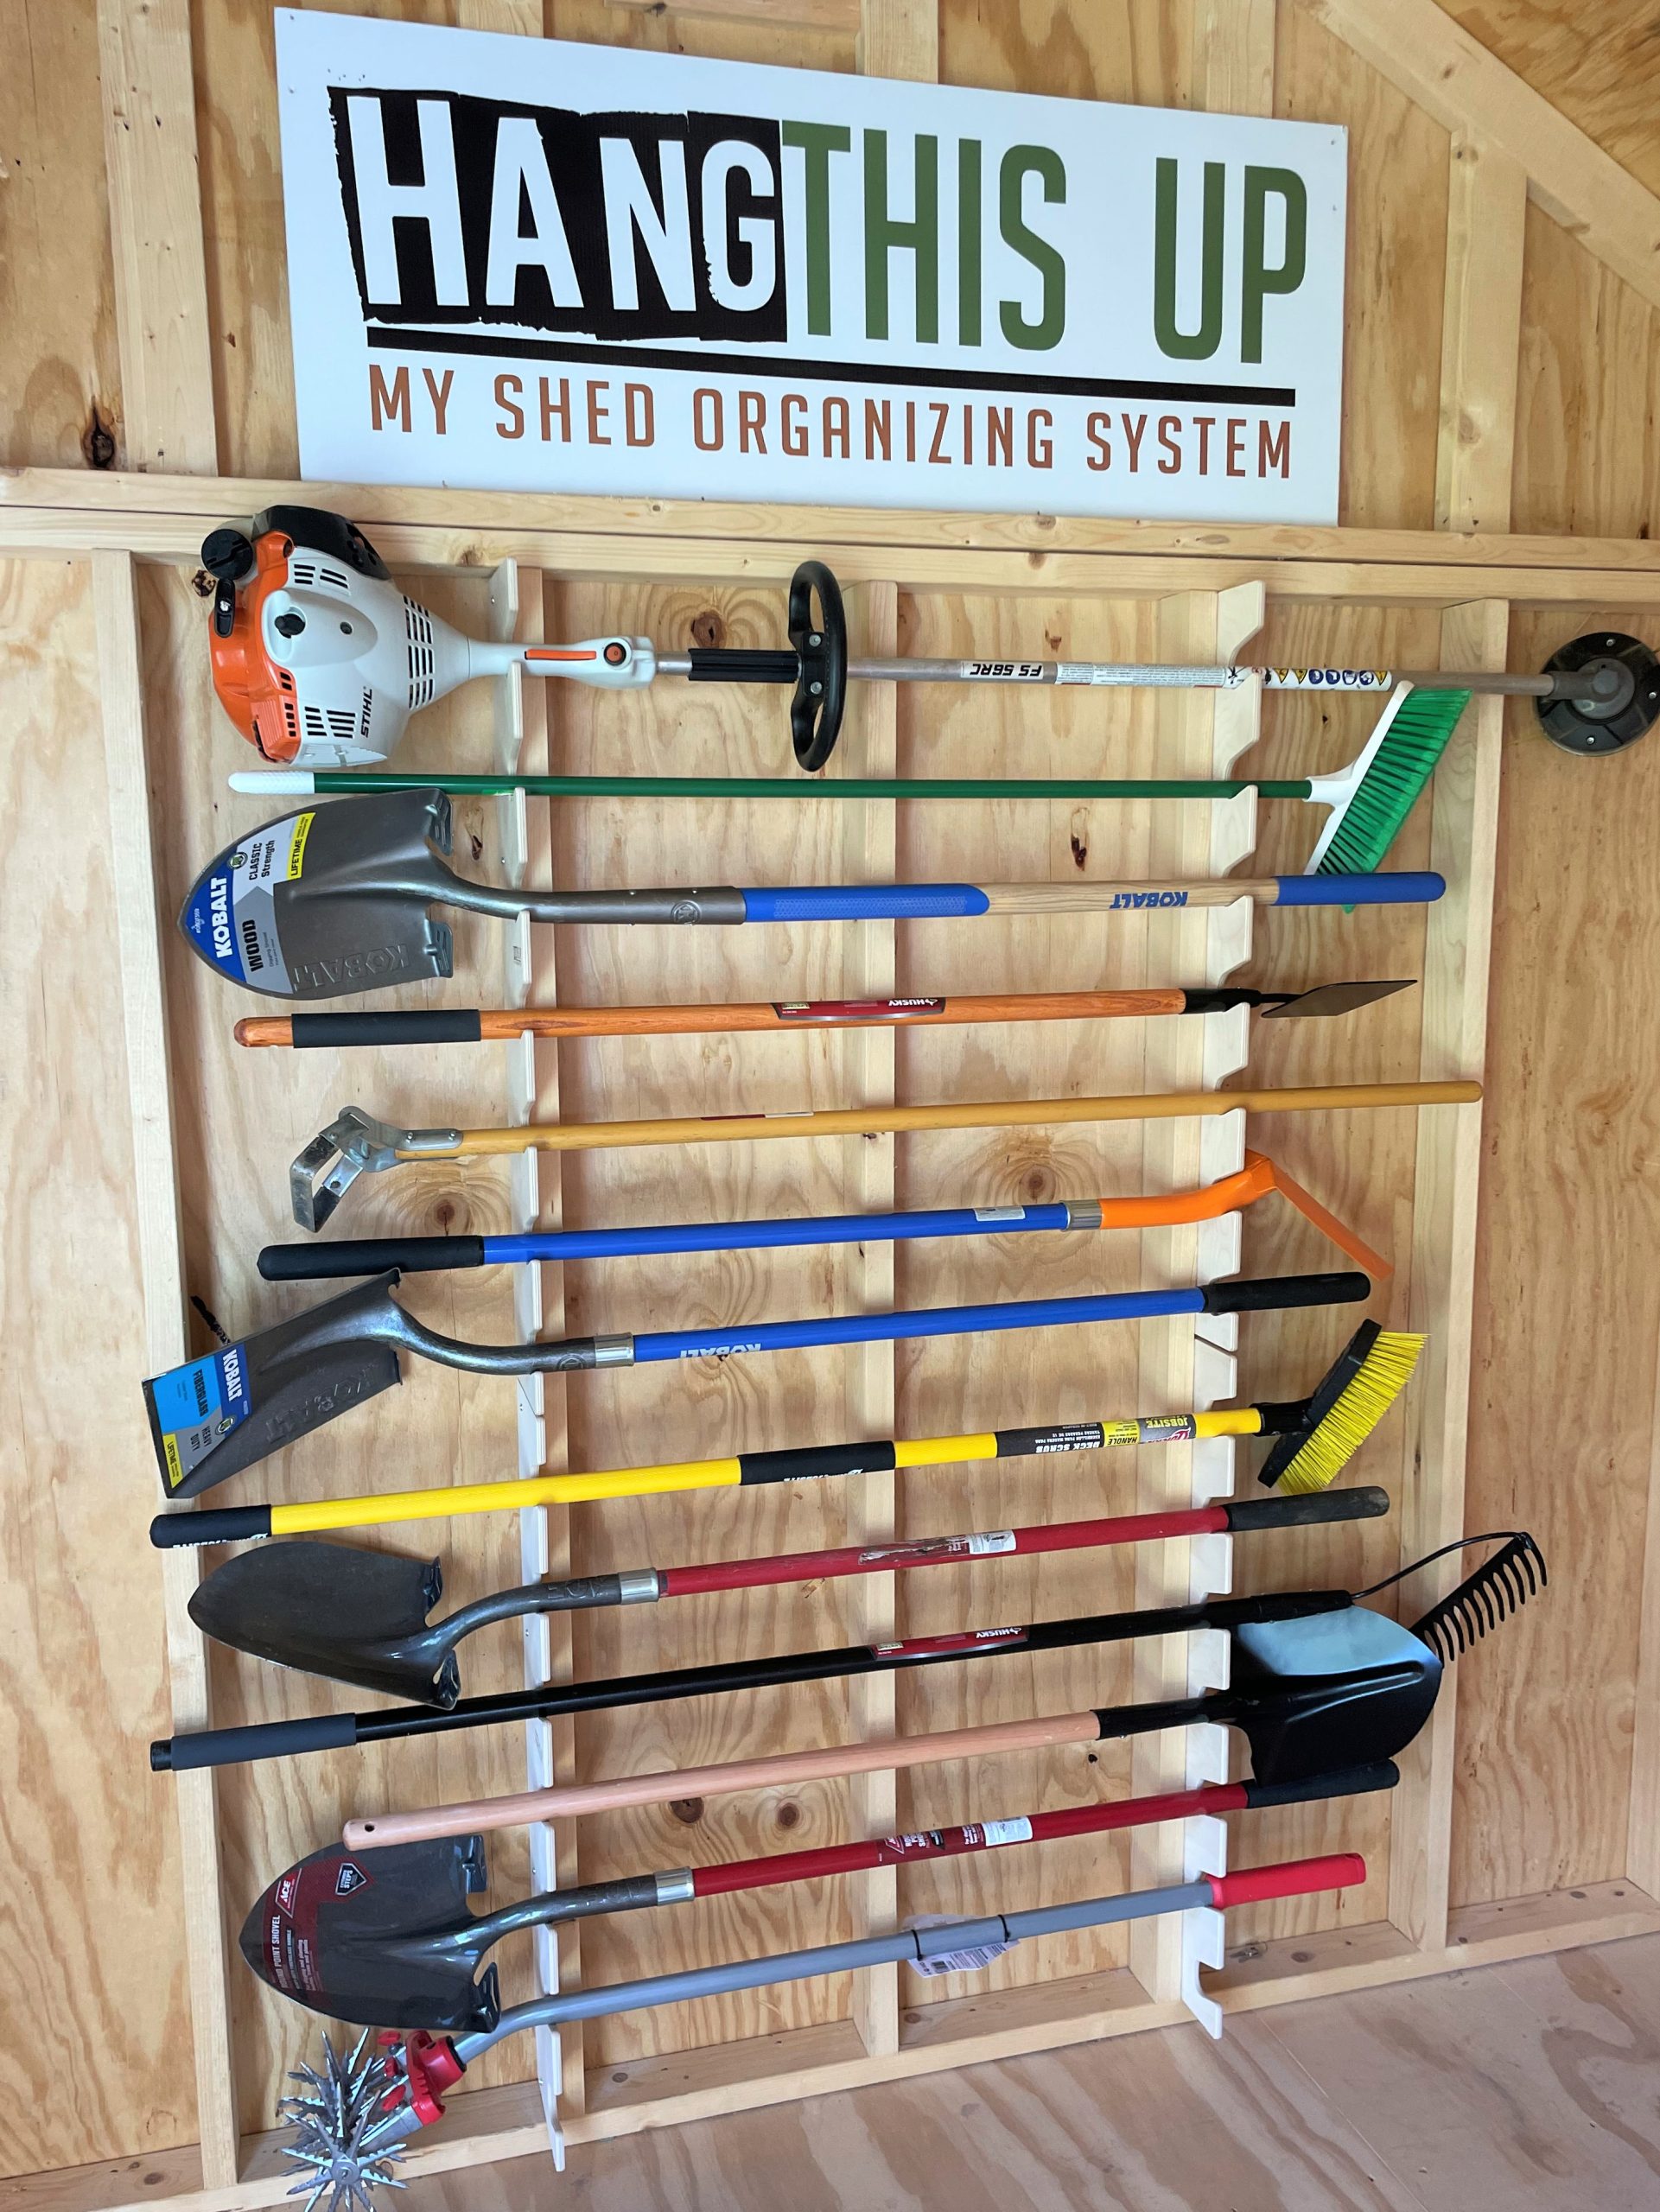
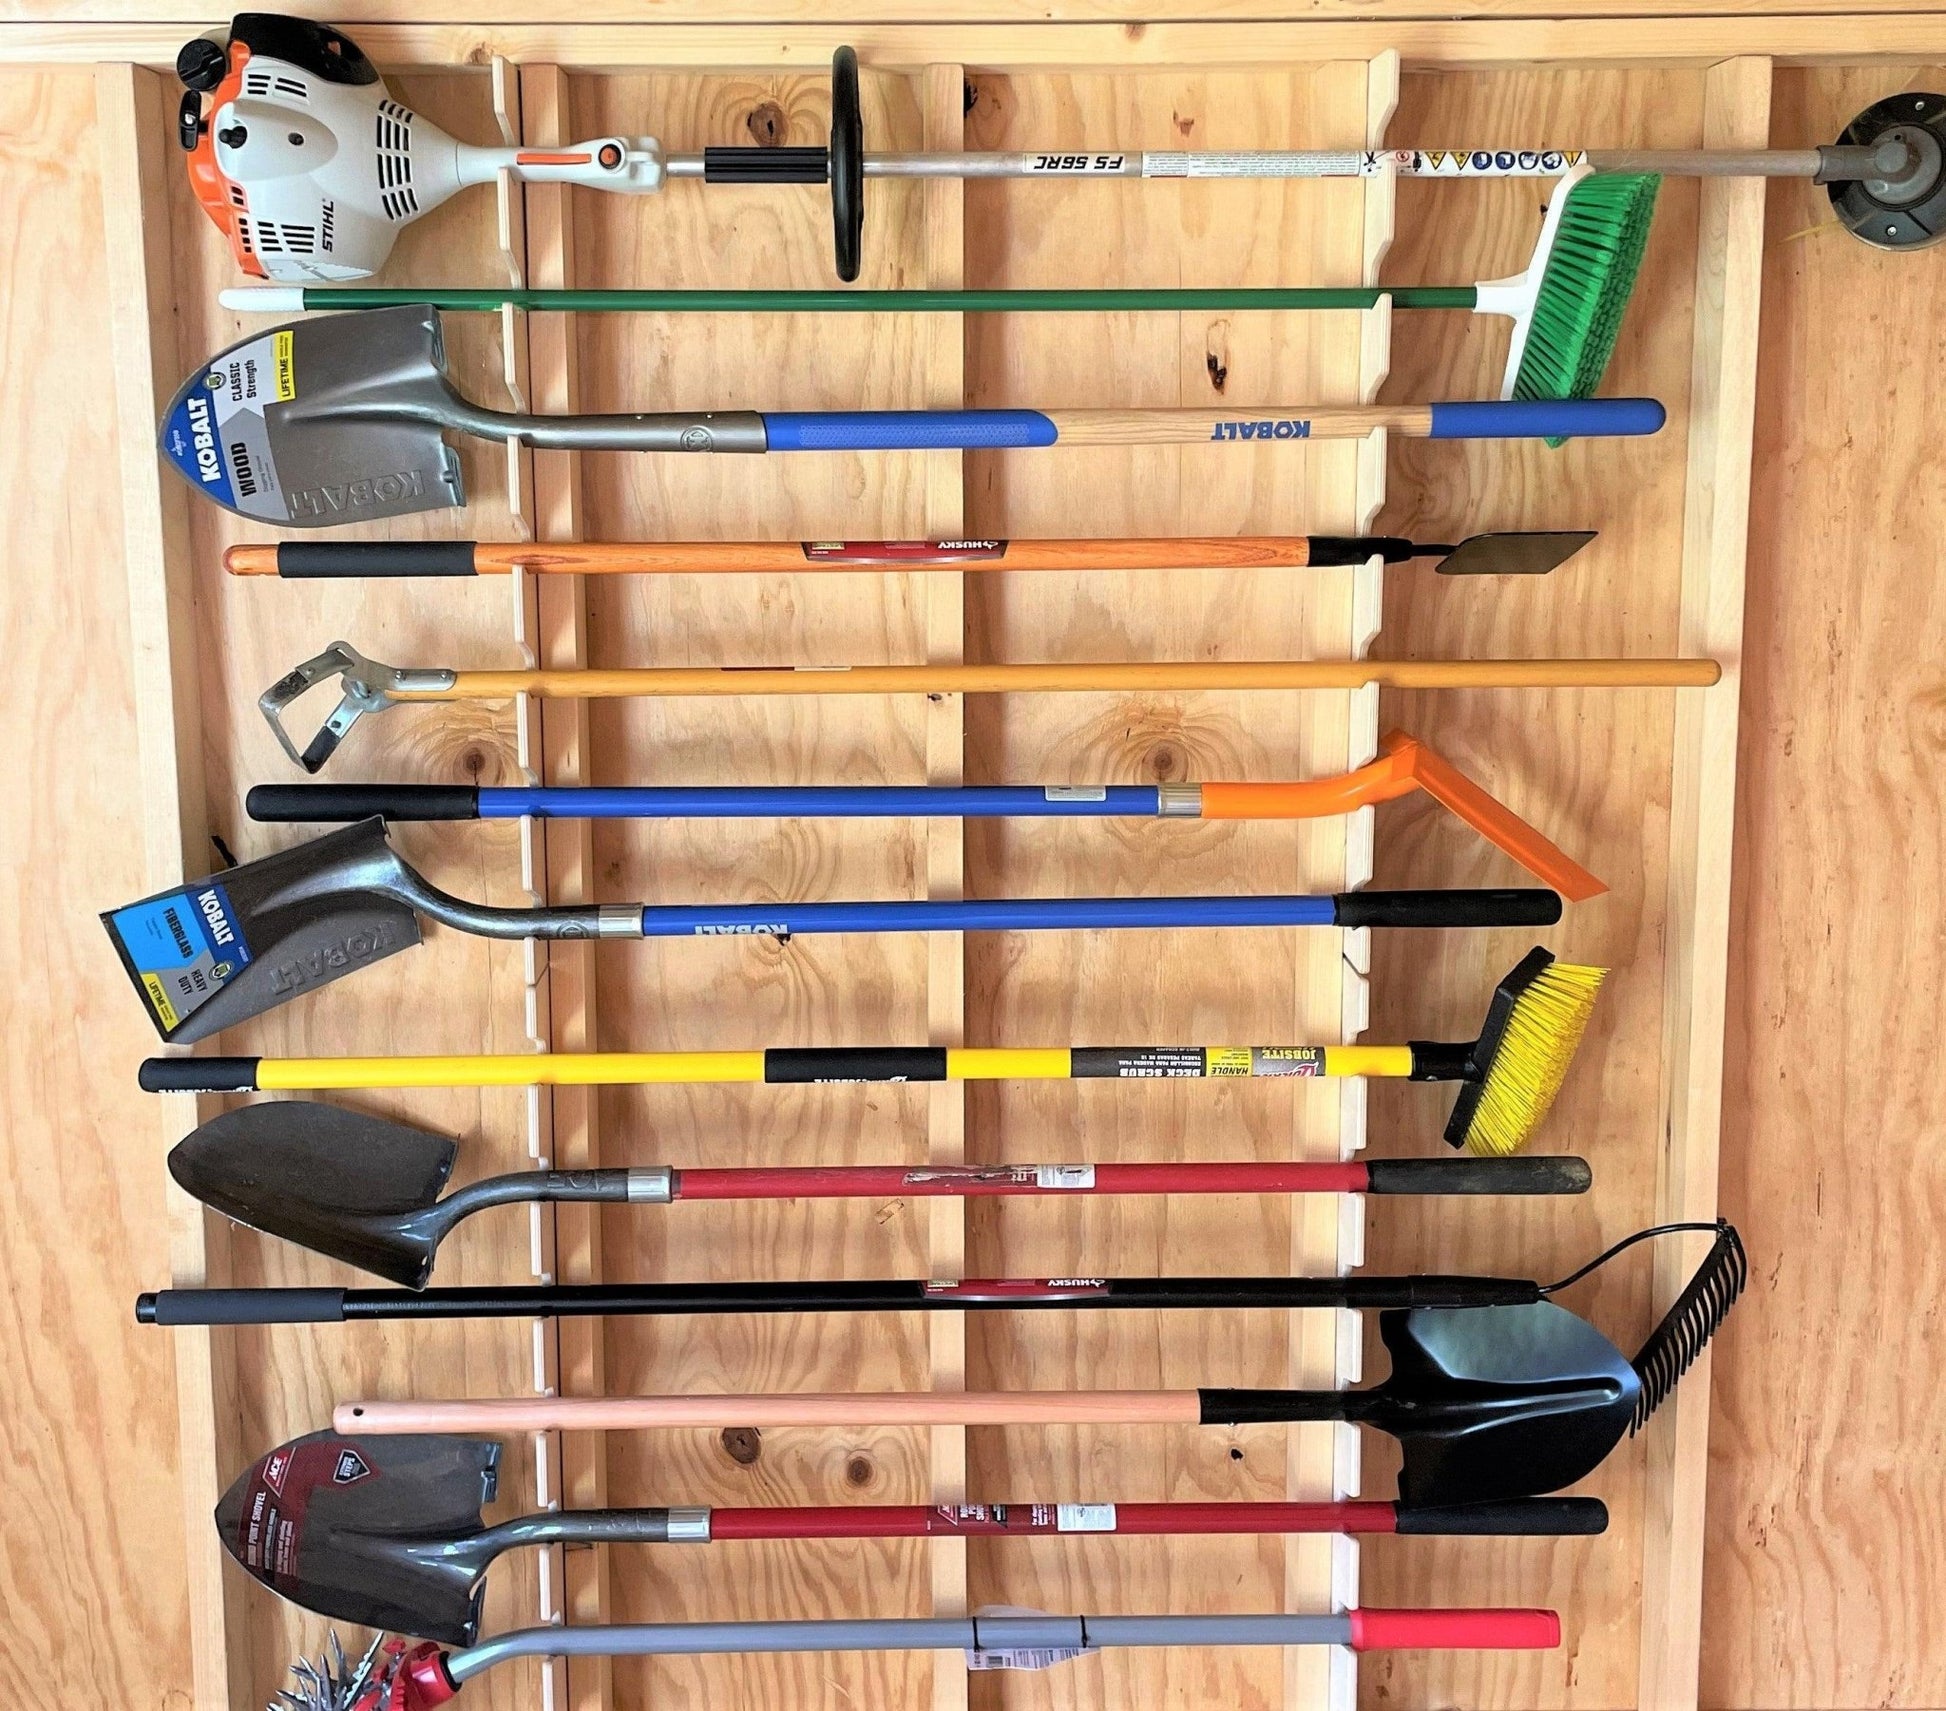
Use Wall-mounted Racks
Wall-mounted racks offer a smart way to organize garden tools. They save floor space and keep tools visible. This setup helps you find tools quickly without digging through piles. Properly mounted racks also protect tools from damage and rust. They make your gardening area neat and safer.
Choose The Right Wall-mounted Rack
Select racks that match your tool types and sizes. Heavy tools need strong hooks or brackets. Smaller hand tools fit well on pegboards or slat walls. Some racks come with adjustable hooks. This feature adapts to your changing tool collection. Check the rack’s material for durability, such as metal or treated wood.
Install Racks At Convenient Heights
Mount racks where you can reach tools easily. Position heavy tools lower to avoid accidents. Place frequently used tools at eye level. Avoid placing racks too high or too low. This setup reduces strain and saves time. Measure your wall space before installation.
Group Tools By Type
Organize tools by function for quick access. Keep pruning shears, gloves, and small tools in one area. Store rakes, shovels, and hoes together. Label sections to maintain order. Grouping helps you plan gardening tasks better. It also speeds up cleaning and storing.
Maintain Your Wall-mounted Rack
Regularly check racks for wear or damage. Tighten screws and replace broken hooks as needed. Clean the rack to prevent rust or dirt buildup. Store tools clean and dry to extend their life. A well-maintained rack keeps your garden tools ready and safe.
Install Double Layer Hooks
Installing double layer hooks is a smart way to organize garden tools. These hooks allow you to store more tools in less space. They keep your tools visible and easy to reach.
Double layer hooks are perfect for hanging shovels, rakes, hoes, and other long-handled tools. They prevent clutter and save floor space in your garden shed or garage. Using these hooks creates a neat and tidy storage area.
Choose The Right Location For Double Layer Hooks
Pick a wall that is easy to access and near your gardening area. Make sure the wall is strong enough to hold the weight of your tools. Avoid placing hooks near damp or wet spots to keep tools dry and rust-free.
Install Hooks At Two Different Heights
Place one layer of hooks higher for long tools like rakes and shovels. Install the second layer lower for smaller tools like trowels and hand pruners. This setup maximizes wall space and keeps tools organized by size.
Use Sturdy Hooks For Heavy Tools
Select metal hooks or heavy-duty plastic hooks that can hold heavy garden tools. Check the weight limit before installation. Secure hooks firmly to the wall using screws and wall anchors for extra support.
Keep Safety In Mind During Installation
Wear safety glasses and gloves while drilling or hammering hooks. Measure and mark hook positions carefully to avoid mistakes. Use a level to make sure hooks are straight and even for a professional look.
Create Corner Storage Solutions
Creating corner storage solutions makes garden tool organization simple and effective. Corners often become wasted spaces in sheds or garages. Using these spots wisely frees up room and keeps tools neat. This approach helps keep your garden tools easy to find and reach.
Use Vertical Space With Corner Racks
Corner racks fit perfectly into unused corners. They hold tools upright and off the floor. This setup keeps your space tidy and tools accessible. Choose racks with multiple tiers to store different tool sizes.
Install Wall Hooks For Hanging Tools
Wall hooks save floor space and display tools clearly. Place strong hooks in corners for hanging shovels, rakes, and hoes. This method prevents clutter and reduces tool damage. Hooks also make tools easy to grab when needed.
Add Shelves For Small Tool Storage
Small shelves in corners hold hand tools and supplies. Keep gloves, seeds, and garden twine organized on these shelves. Shelving keeps everything visible and within reach. Label shelves for quick identification of items.
Utilize Tool Caddies And Buckets
Organizing garden tools can be simple with the right accessories. Tool caddies and buckets keep your tools neat and easy to carry. They prevent clutter and save time searching for items.
These containers come in various sizes and designs. Choose one that fits your tool collection and gardening style. This method helps keep your workspace tidy and efficient.
Easy Access To Garden Tools
Tool caddies and buckets keep tools within reach. You can carry them around the garden effortlessly. No more running back and forth to the shed or garage.
Small tools like pruners, trowels, and gloves fit perfectly in caddies. This organization style makes gardening more enjoyable and less stressful.
Protect Tools From Damage
Proper storage in caddies and buckets protects tools from damage. It stops rust and wear caused by moisture and dirt. Tools last longer when stored properly.
Separate sharp tools from delicate ones. Use compartments or dividers inside the caddy to avoid scratches or dulling.
Portable And Lightweight
Most tool caddies and buckets are lightweight and easy to carry. This portability lets you move your tools quickly from one spot to another. Choose buckets with sturdy handles for comfort.
Some caddies have multiple pockets for better organization. This feature helps keep small parts like seeds or twine handy.
Credit: shedrepair.net
Label Tool Spots Clearly
Clear labels help keep your garden tools tidy and easy to find. Each tool has its own place. Labels reduce time spent searching for items. This system also helps prevent misplacing tools.
Labeling makes your garden space look neat and organized. It guides everyone to return tools to their right spot. This keeps your tools safe and in good condition.
Use Simple And Large Fonts
Choose fonts that are easy to read from a distance. Large letters help you see labels quickly. Simple fonts avoid confusion and make reading fast.
Choose Weatherproof Labels
Use labels that resist water and sun damage. Weatherproof labels last longer in outdoor sheds and garages. This keeps labels clear and readable for months.
Label Each Tool Shape Or Size
Match labels to the tool’s shape or size. This helps quickly spot where each item belongs. It also prevents mixing similar tools in the wrong place.
Color Code For Easy Identification
Use different colors for various tool types. Colors make it easier to group and find tools. This method saves time and reduces mistakes.
Place Labels At Eye Level
Put labels where you can see them easily. Eye-level placement speeds up tool retrieval. Avoid placing labels too high or too low.
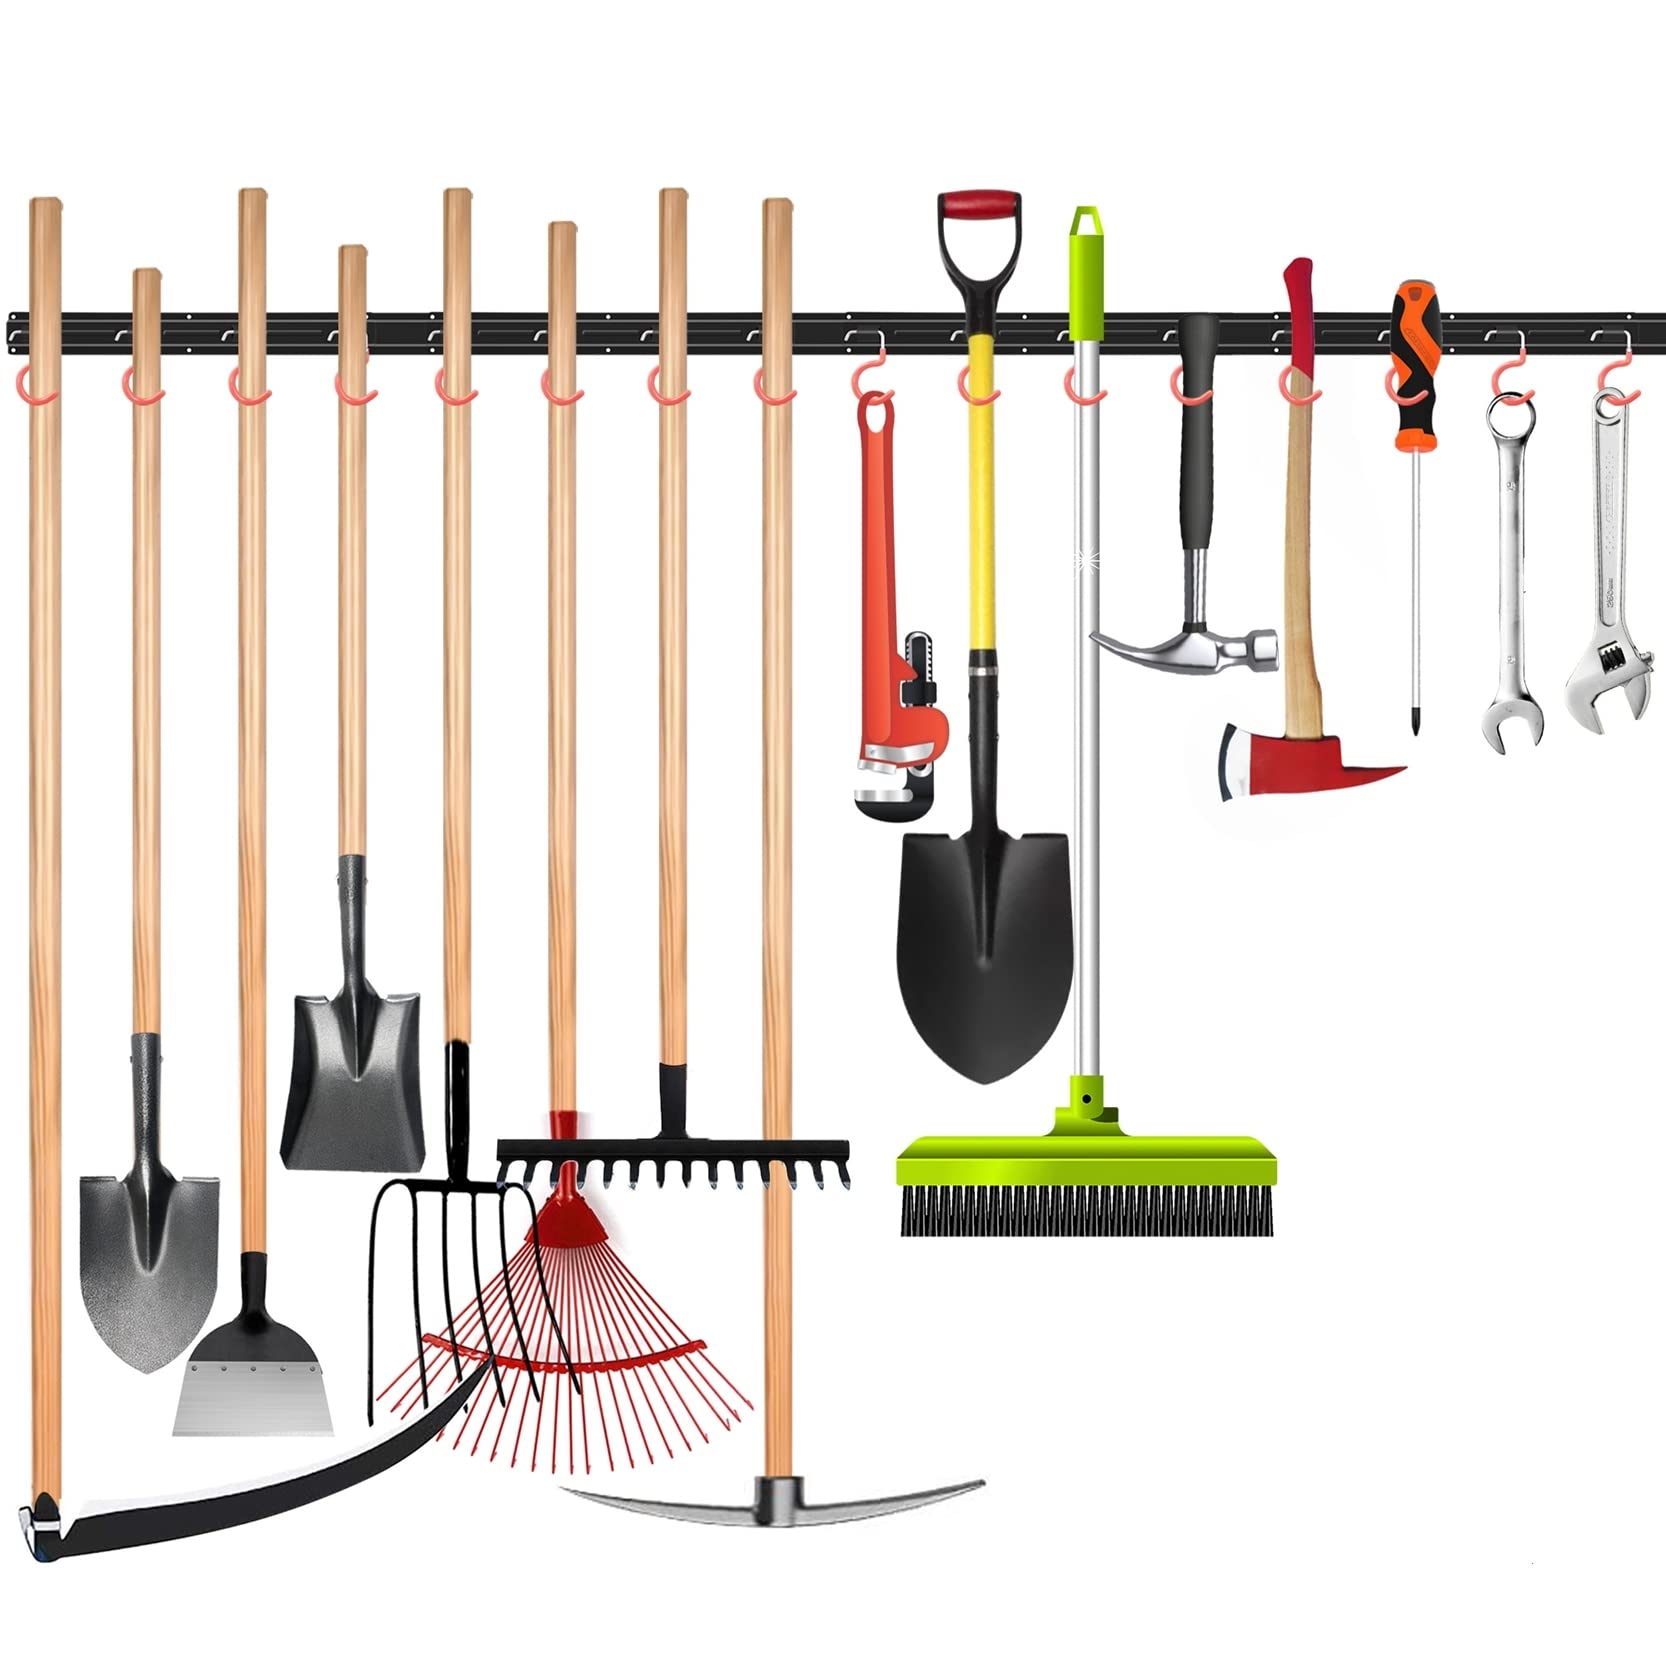
Maximize Vertical Space
Maximizing vertical space is a smart way to organize garden tools. It keeps tools off the ground and frees up floor space. Vertical storage helps you see all your tools clearly. This method makes your garden area tidy and easy to manage.
Use Wall-mounted Hooks And Pegboards
Wall-mounted hooks hold tools like rakes, shovels, and hoes. Pegboards are perfect for smaller tools such as pruners and gloves. Both options keep tools visible and easy to grab. Installing these on walls saves valuable floor space.
Install Tall Shelving Units
Tall shelves offer multiple levels to store pots, bags, and small tools. Use sturdy shelves that can hold heavy items. Label shelves for quick tool identification. Vertical shelves organize many items without crowding your space.
Hang Tool Racks And Holders
Tool racks keep long-handled tools upright and secure. Choose racks that fit your tool sizes. Place racks near your garden entrance for easy access. Hanging tools prevents damage and keeps them dry.
Create Overhead Storage Solutions
Overhead storage uses ceiling space for rarely used items. Install hooks or pulleys to hang ladders or wheelbarrows. This keeps bulky items out of the way. Overhead storage maximizes space without cluttering walls or floors.
Credit: hangthisup.com
Incorporate Adjustable Holders
Incorporating adjustable holders into your garden tool organization system saves space and adds flexibility. These holders adapt to different tool sizes. They keep everything neat and easy to reach. Adjustable holders help avoid clutter and damage to tools. They work well in small sheds or large garden rooms.
Benefits Of Adjustable Holders
Adjustable holders fit various tool shapes and lengths. You can move or remove holders as needed. This flexibility keeps your garden tools secure and organized. It also prevents tools from falling or getting tangled. Adjustable holders allow quick changes when your tool collection grows.
Types Of Adjustable Holders
Spring-loaded hooks grip handles tightly. Slide holders adjust to hold rakes, shovels, and hoes. Some have rubber grips to protect tool handles. Magnetic strips work for small metal tools. Choose holders that match your tool types and storage space.
How To Install Adjustable Holders
Select a sturdy wall or board for mounting. Use screws or strong adhesive for secure fixing. Space holders according to tool size and quantity. Arrange heavier tools lower for safety. Test each holder to ensure it holds tools firmly.
Maintaining Your Adjustable Holders
Check holders regularly for wear or loosening. Tighten screws or replace adhesive if needed. Clean holders to prevent rust or dirt buildup. Keep tool handles dry to prolong holder life. Replace damaged holders to maintain safe storage.
Maintain Regular Shed Cleanups
Maintaining regular shed cleanups keeps your garden tools organized and ready for use. A tidy shed prevents damage and makes tools easy to find. Cleaning often stops rust and dirt buildup on your equipment.
Regular cleanups also help spot broken or missing tools early. This lets you fix or replace items quickly. A clean space encourages you to take better care of your garden tools overall.
Set A Cleanup Schedule
Choose a specific day or week each month for shed cleaning. Sticking to a schedule builds a routine and keeps clutter away. Even short, frequent cleanups work better than long, rare ones.
Sort And Categorize Tools
Group tools by type or use during cleanup. Keep similar items together for quick access. Label shelves or bins to help maintain order after each use.
Clean Tools Before Storing
Wipe dirt and moisture off tools before putting them away. Dry tools prevent rust and extend their life. Use a brush or cloth to remove soil and debris.
Inspect And Repair Tools
Check tools for damage or wear during each cleanup. Tighten loose handles and sharpen blades if needed. Fixing tools early saves money and improves safety.
Declutter And Donate
Remove tools you no longer use or need. Donate good items to neighbors or community gardens. Clearing space makes room for essential tools and improves organization.
Credit: www.amazon.com
Conclusion
Organizing garden tools saves time and reduces frustration. Neat storage keeps tools safe and easy to find. Use racks, hooks, or caddies to tidy your space. Regularly cleaning tools helps them last longer. A well-organized garden area boosts your gardening joy.
Start small and build your system step by step. Clear spaces invite more gardening and less stress. Good habits make tool care simple and effective. Keep your garden tools ready for the next project. Enjoy a neat, functional garden with smart organization.